Showing posts with label baby quilt. Show all posts

Wednesday, April 20, 2016

A Mess of Thread

This is a pretty wonky post so if you aren't into the minutiae of quilting, you may want to just scroll through the pictures.

I thought it would be fun to describe how I came to quilt (and quilt) my latest quilt. Don't you find it confusing that quilt is both a noun and a verb? I started with a very simple pattern in one of my older books. The pattern is a traditional Boston Common with some four-patch blocks in alternate rows. I chose it because I had a stack of mostly sunflower fabrics to use and the required amounts meshed well with what I had. It's also a pattern I love, so I knew I would enjoy piecing it.

I chain pieced the blocks, finishing the top over a couple of weekends. Then came quilting decisions. One reason I put this simple top together was to practice quilting with my new toy, a free motion quilting foot set. It is pretty cool. Three different feet on a base that attaches to my machine. Open toe, closed toe and for lack of a better term, big toe.

I started off stitching in the ditch along several major seam lines to provide stability. I'm not convinced when everything has been spray basted that this is a necessary step, but it gave me a chance to move the quilt around under my machine, assessing what might work for free motion patterns. I knew I wanted some curvy quilting to offset the straight lines of the design, and I wanted some of that quilting to be feathers.

Quilted
Starting in the light center portion, I quilted feathers out from the center to the yellow corners. I liked the effect but had chosen a variegated yellow thread and it just didn't show up as much as I wanted it to. I let that thought percolate for a while as I quilted a leaf and vine pattern in the green squares, treating them as a border. Originally I had selected a green thread for this, but opted to keep my machine threaded with yellow, increasing visibility on the green background. Better, though still not a strong enough statement. A friend suggested I go around a second time, outlining the leaf and vine pattern. That second row of yellow quilting really helped.

For the outside border I chose piano keys for their straight lines, balancing the curved quilting everywhere else. The green thread worked well here. I used blue painter's tape along the block points to mark the keys and guide my stitching, which I carried into the green border, stopping each line where it touched the leaves. For these straight lines I switched back to a regular foot, not free motion. This provided greater control but also meant I had to stop and start over for each line. I think long-arm quilters use a ruler for this work. I hear a ruler foot is available for a domestic machine now--maybe that will be my next toy?

Red Thread!
Next came filler quilting. To make motifs pop you need to flatten the background. To accomplish this I first echo quilted my feathers twice using yellow thread, then switched to Bottom Line thread in off-white so it would not compete with my feathers and stippled the open areas. I loved how the feathers began to fill and stand away from the background but that yellow thread still blended into the background to the point of disappearing! In desperation I grabbed a spool of heavy, dark red thread and quilted over one of the feathers, figuring I could rip it out if I wasn't pleased. Not bad! I took a deep breath and over-quilted all the feathers with dark red, leaving the yellow beneath and as echo quilting. Much happier. Who would have thought?

Vines, feather, piano keys and fill
Remember the green thread? I decided to use it as filler thread around the vine, as the color blended with the background better than my Bottom Line off-white. Being thicker than Bottom Line, the green also provided a nice texture change. I filled all the spaces between the leaves on the side of the quilt next to the center, but on the side with the piano keys I opted to add filler only to a few larger spaces, between the keys. I love the effect!

All that's left is to bind and label. I'm seriously thinking of naming it A Mess of Thread--all that quilting and over quilting and issues with tension as I learned to work with my new feet! For the record, I really like them. Much better than my old clear plastic foot that wasn't so clear any more and was hard to see through and hard to see around. The metal feet are so much smaller they don't obscure my vision at all. If you've stuck with me this long, you are truly a quilting geek! Go quilt!

The back

Thursday, September 10, 2015

Friendship Maine

4 days, 5 quilts and more. A fitting end of summer retreat. I am teaching a techniques class at Sew Portland this weekend and next on creating quilts from photos (like these!) Call the store to see if there is space available at 797-6700.
Morning Walk
Fairies live here

Done

Thursday, May 21, 2015

Voila!

Voila!
I am teaching a two-day class at Sew Portland (part 2 is this Saturday.) We are working on raw-edge fusible applique. I designed an easy baby size quilt to learn on.

Last Saturday we spent time choosing fabrics--each student had her own unique vision. Fabric shopping is so much fun! We could have spent the whole day playing with fabrics but eventually we got to work cutting and stitching the backgrounds and learning to use fusible web. The product we used in class is Steam-a-Seam II Lite. My personal favorite is an oldie but goodie, Wonder Under. I love that stuff. But Steam-a-Seam has the advantage of acting like a Post-It note until you are ready to hit it with the iron, so the applique pieces go on the design wall, get moved around until you love it, then set with the iron, no pinning involved! A huge advantage in a classroom situation or for working on the large-sized petals in this pattern.

With tops done, students headed home to spray-baste the quilts in preparation for this week's completion session. If all goes according to plan, they will secure the fused applique with a variety of stitches, add some quilting in the background (free motion here we come!) and finally, apply the binding entirely by machine.

I couldn't resist showing off Victoria's completed top--she chose prints for her flower petals and added a border to make the quilt a little bigger. Flower Power!
Victoria's top


Sunday, February 8, 2015

Perseverance Pays Off


I just had to give a shout out to another student in the Stacked Coins class. Charlena has taken a few classes with Linda and me before, and is quite a good piecer. She has had some major frustration with free motion quilting in the past, though. Neither she nor I could get her machine to behave. Thread kept breaking, no matter what we tried in class. It would run fine on a sample piece, then we would move to the stacked coin quilt and stitch for a few seconds when Bam! the thread would break. Same thing last class she took. We tried changing needles, re-threading. No luck.

Well, she went home and here we are, a few weeks later--Voila! look at that lovely quilt, free motion quilted all over the background. Just in time for Valentine's Day, too, with her themed fabric choices. Charlena says she bought a new free motion foot and some Aurifil 100% cotton thread and it seemed to work. I say, whatever combination of things made the magic happen, yippee! Time to get out some of those other tops that have been waiting and get stitching.

Love it when perseverance finally wins out over frustration. Thanks for sharing the photo and your triumph, Chalena!

Thursday, January 29, 2015

Stacked Coins

Cindy's Stacked Coins baby quilt
Beginning quilter classes are such fun to teach! Linda and I just finished teaching a two-day class using the Stacked Coins pattern, which we modified from a Moda pattern that is available several places online. It is a great beginner pattern, as it starts with a charm pack and has no matching seams, thus reducing concern about accurately cut patches. We finally have the lesson plan tweaked so the quilts were very nearly complete at the end of class. Most students just had to finish quilting and add binding, and many had the binding cut and ready to go.

One of our students, Cindy, sent these photos of her completed baby quilt! Quilted with straight-line stitching and beautifully bound with the same fabric as her backing. Well done! We love seeing our students' work. Send more pictures!

Next up is a Free Motion Quilting class, on Saturday, February 21, 10:00 to 3:00. Lots of hands on practice there, learning to 'draw' with the sewing machine needle. I encourage students to bring in unfinished quilt tops so we can brainstorm various ways to quilt and complete them. Want to join the fun? Sign up at Sew Portland--in person at 306 Warren Ave in Portland, or by phone at 797-6700. 

Tuesday, November 12, 2013

Fall Classes

I have taught more classes this fall than ever! Free Motion Quilting is a very popular class--the third session is coming up Saturday. We unravel the mystery of "quilt as desired" and leave with the skills and confidence to finish quilts on your home sewing machine.

Yellow Brick Road is a classic pattern. I generally have not used a pattern for my classes, probably because I rarely use patterns for my own quilts. Every class is a learning experience for me. I had wanted to see tops completed, but we ran out of time before borders could be stitched. Everyone left with a plan and fabric to finish, so that part is good, but I'll have to build in more time to shop! I enjoy teaching and hope to continue with a regular schedule--although we are heading into a tough time to fill classes--holidays followed by snow days. Wouldn't it be nice to spend a snow day sewing a cuddly new quilt?

 Quilt Gallery

Sunday, April 7, 2013

Stephannie's Monkeys

Stephannie finished her quilt! She took the Stacked Coins class but missed part of it, so she caught up with Linda and me to complete her adorable Monkey baby quilt. It is a present for a nephew, and I think it came out great! Especially love the red and white striped binding, which she completed entirely by machine. Check out the straight rows of quilting in the solid cocoa brown, too. Nice work, Stephannie! Anyone else from the class want to send a photo to post?

I expect to teach another class later this spring. I hope to have the posting up on the Sew Portland site soon.

Quilt gallery and quilts for sale at:Photos

Wednesday, March 13, 2013

Stacked Coins and Class Announcement

Liz' Kidz
I start with have high hopes that all the students in my classes will leave with a totally finished product. I am finally realizing that it isn't about taking that last stitch--it's about what you learn along the way. The Stacked Coins class learned color and fabric selection, cutting techniques, tips to improve design and layout, setting up their machines to sew scant 1/4" seams, string piecing, spray basting, straight and free motion quilting, a little quilt-as-you-go, binding and labels. Most are also done or very nearly done with their quilts, so, mission accomplished! Whew!

Monkeys! by Stephannie
Ready for more? Linda and I will be teaching "In Living Color" as our next adventure. Linda is only able to join us for the first session, Friday, March 29 at 3:00. This will be a test to see how I manage without my trusty co-pilot. The class continues on April 5 and 12, with a goal of completing Just the Top! This class starts with an image or object you bring whose colors inspire you, and translates that inspiration into the the colors of your quilt. Trust me!

Grandmother's China by Rana

Quilt gallery and quilts for sale at: Photo Album

Sunday, January 6, 2013

Stacked Coins Tutorial, Part 2

When we left off, you had 3 columns of stacked coins completed. Time to create the sashing. Cut strips from your background fabric. Cut 2 strips 5” by width of fabric (42”) and 2 strips 6 ½” by width of fabric. Lay out the quilt top: Wide sashing strip, stacked coin column, narrow sashing strip, stacked coins, narrow sashing, stacked coins, wide sashing. See completed quilt, below, for layout.


Sew strips together. Make pairs of coins and sashing, sew with coins on top. Press seams toward sashing. You will have one extra sashing strip. Sew paired strips together, then add the final sashing strip. Press seams toward sashing. Square up the top if needed. 

Trim selvages from backing fabric. Piece if desired. Leftover charms make a nice row to piece into the back. Press back flat. Layer backing, batting and quilt top, baste with spray or pins. Your quilt is ready for quilting! 

I quilted in the ditch between the sashing and stacked coins, using a walking foot. I continued adding straight lines in the sashing, marking the lines with chalk. Then I switched to a free motion foot and sewed wavy rows across the stacked coin columns. Minimally, quilt as closely as your batting package recommends.
 
Once the quilting is done, it’s time to bind the quilt. Cut your binding fabric into strips 2 ¼” wide by width of fabric. Piece the strips together, to make one continuous length at least 15” longer than the quilt’s perimeter. This quilt needs about 170” of binding. Fold in half lengthwise with wrong sides together, pressing as you go, to make a strip that is 1 ⅛” wide. Stitch to quilt, matching raw edges and mitering corners. Finish tails with a diagonal seam. Trim backing and batting ½” away from the seam. This will give you the ¼” seam plus about ¼” of backing/batting to fill the binding. Press binding away from quilt. Turn folded edge to quilt back and stitch by hand. Try not to let stitches show on the front.
 
Make a label with your name, date, location and any other information you would like. Labels can be plain or fancy, using a fabric marker, embroidered, printed on prepared fabric, painted, or stamped. Sew securely to back of quilt. Show off your new quilt!


Quilt gallery and quilts for sale at: Rana's Quilt Photos

Saturday, December 29, 2012

Stacked Coins Tutorial Part 1

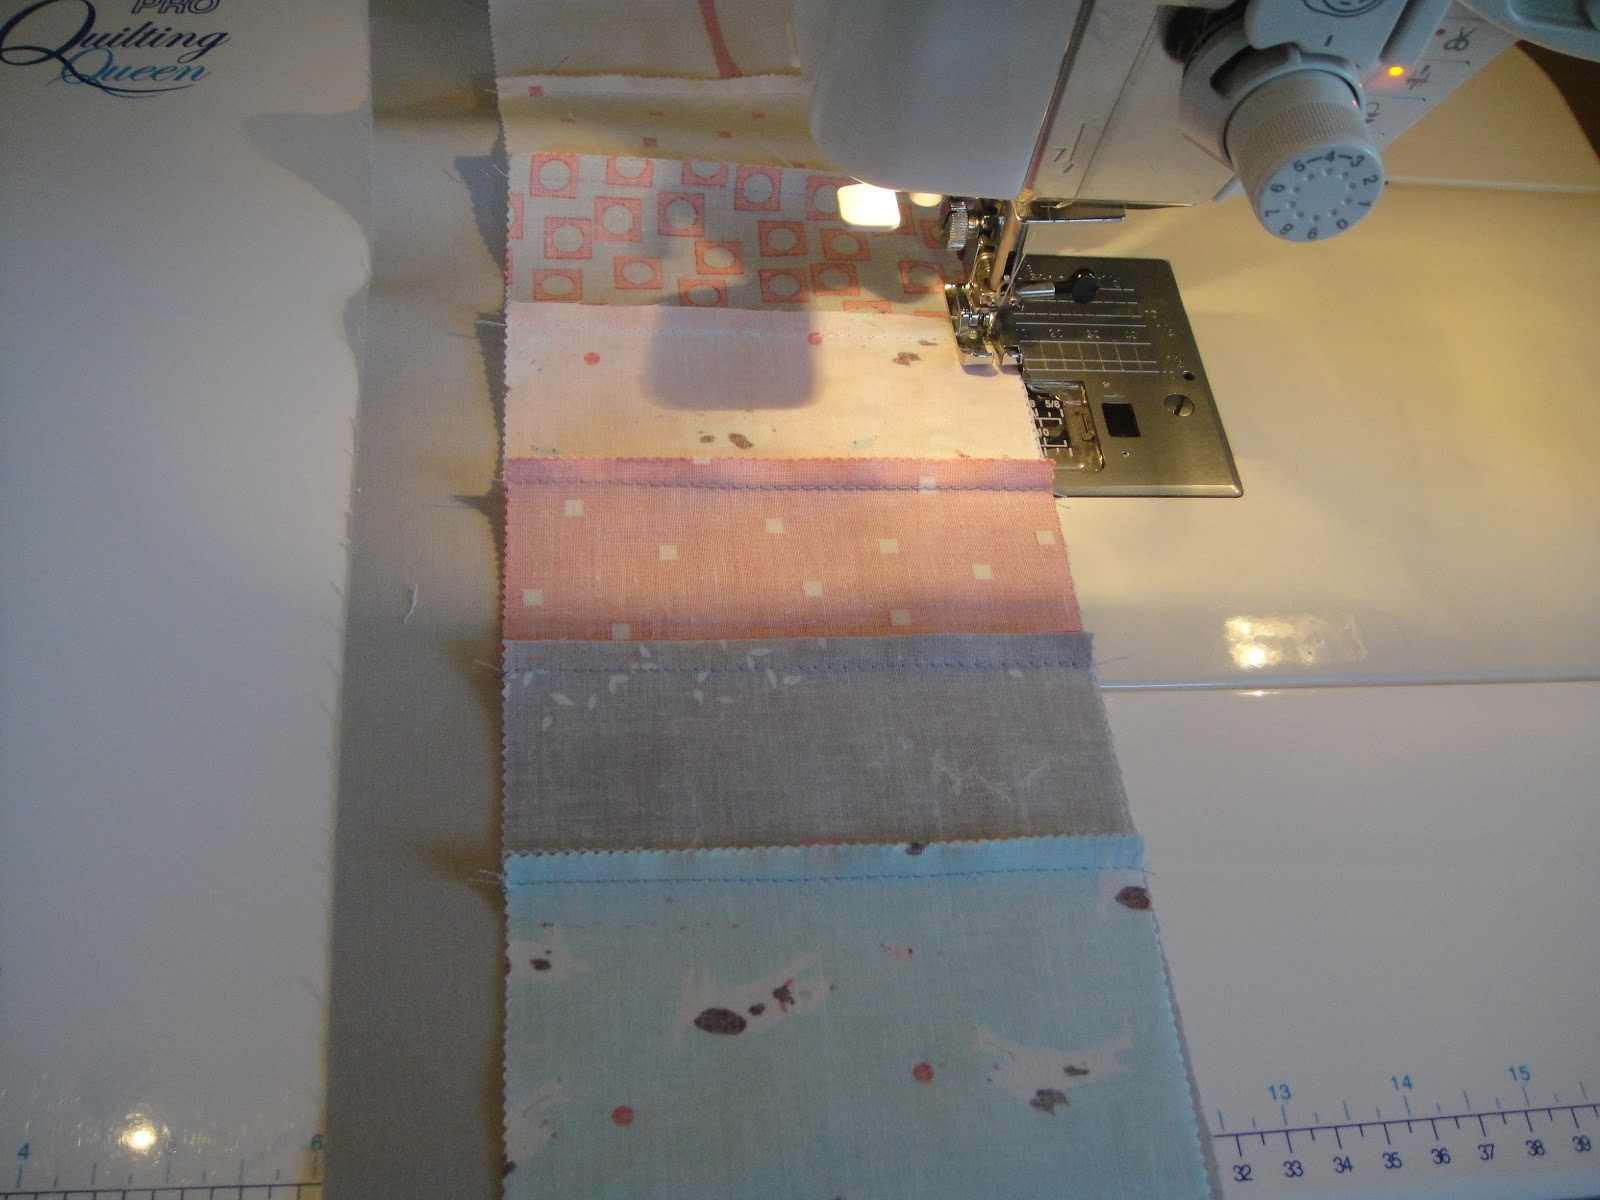
I am teaching a 6-week series for new quilters at Sew Portland starting January 25. I thought it would be fun to post a tutorial here for the stacked coins quilt we'll be working on in class. Work along with us if you like! Here are the fabric requirements:
 
 Select a charm pack or equivalent fabric (you will need at least 30 charms). Add 1 yd of neutral background fabric; 1⅓ yards backing fabric; ¼ yard binding fabric (or a fat quarter) and 1 crib size batt.
 
 Cut charms in half. I chose to leave a few uncut, like the girl on a swing--so look through your charms before you cut! If any of your charms have directional prints, be mindful when you cut them—note the dogs on the red charm.
 Make two stacks of cut charms (coins) and start chain piecing pairs. Try not to get too fussy about which coins to pair up. Leaving 8 to 10 coins unpaired will give you design flexibility. Press paired coins open, pressing seams to one side. Lay out 3 columns with 20 coins in each column. Don’t forget to include any uncut charms in your columns—count each of those as 2 coins. Use your single coins as needed to create three columns that make you happy. Stitch columns, press. They should each be roughly 42” long.
 
 Check back for part two. This is a super simple quilt and lots of fun to make with different fabric and quilting choices. Any questions? 

Quilt gallery and quilts for sale at: Rana's quilt photos

Monday, September 28, 2009

Quick update

Sarah Ann Smith's book is very nearly on the shelves! It is called 'Threadwork Unraveled'. I still don't know if "Postcard from Rajasthan" made it in or not, but either way, very cool. Meanwhile, a very quick update and a quick peak. We started a new group quilt at work--lots of fun techiques incorporated from things we have learned. It has to do with trees and I promise a photo when we get it done, but that's it for now! Meanwhile on the home front: McAuley Angel continues to collect embellishments--silk vines and the promise of beads to approximate the mounds of hydrangea surrounding her at this season, and the baby quilt, "Where the Deep Ones Are" a la 'Where the Wild Things Are' is beginning to take shape. Lots of stitching, not much writing!

Quilt gallery and quilts for sale at: http://community.webshots.com/user/roconnorquilts

Sunday, September 20, 2009

Finishing Up

I think we can call the Barbara Olson workshop quilt done as well. I went back (after completely quilting it) and added more purple vine quilting to the border, and quilted within the petals, mostly just on along the vein to make the trapunto pouf a bit more. Enough on that one!

McAuley Angel is ready for embellishing. I have some great silk vines and a few bead-y ideas. I do love the paint and glitter on her wings, but am still not sure about this one.

Finally, we went fabric shopping for a baby quilt for our friends who own a gaming shop/bookstore. Hubby drew up the design. The fish blocks are done. Time to get to work on the body. It is going to be a Wild Thing!


Quilt gallery and quilts for sale at: http://community.webshots.com/user/roconnorquilts